March is National Nutrition Month.
There are several things to think about when picking food to include in your emergency food supplies. They include:
- Shelf life. Shop for nonperishable items
- Foods that don’t require cooking, water, or special preparation are best.
- Does your family have food allergies or other special dietary needs?
- How much do you need to keep your family fed? Where will you store it?
Often less attention is paid to the nutritional facts of the foods in our emergency kits. But taking care of your body is an important part of self-care during an emergency. One way to do that is to try to eat healthier foods.
Here are a few tips to help you build a nutritious emergency food supply.
Improve Your Food Label Literacy
Knowing how to read food labels is a practical skill that you can use to make decisions about what goes in your emergency food supply.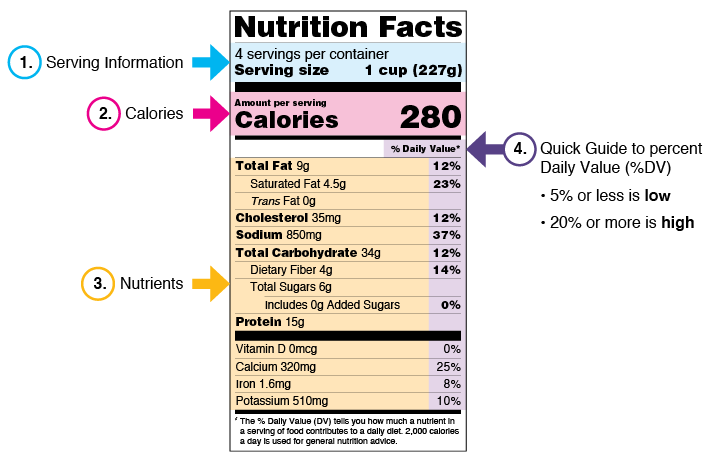
Nutrition Facts labels include information on serving size, calories, and nutrients that can help you make healthier food choices.(1)
Because you can’t know how an emergency will affect your every day, you may want to stock your food supply with more calories than you normally eat. A day spent cleaning up after a disaster expends more calories than one spent sheltering in place.
When using food labels to help make healthier choices consider the serving size, especially how many servings there are in the food package. The number of servings you eat determines the number of calories you’re eating. Eating too many calories per day is linked to overweight and obesity.
Shop Smart
When shopping for food, imagine having to rely on your emergency food supply and emergency water supply. How will you meet your family’s nutritional needs on a limited supply of water and without access to grocery stores and restaurants? Here are some things to think about when buying for your emergency food supply.
Include Fruits and Vegetables
Canned and shelf-stable fruits and vegetables can be a nutritious addition to your emergency food supply. Look for low and no sodium and no-sugar-added options. Also, consider dried fruit and nuts.
Look for Lower Sodium Foods
Sodium (salt) helps to preserve some foods, especially shelf-stable canned items. Salty food can increase your thirst, which could cause you to drink more water than you planned when creating an emergency water supply.
You should store at least 1 gallon of water per person per day for 3 days for drinking and sanitation. Try to store a 2-week supply of water, if possible.
Most of the sodium you eat is added to packaged foods before you purchase them. This makes reading food labels and choosing lower sodium foods even more important.(2)
Different brands of the same foods may have different sodium levels. For example, sodium in chicken noodle soup can vary by as much as 840 mg per serving for different brands. Look for brands that advertise low or reduced sodium. Compare the nutrition facts panels of different brands to choose the lowest sodium option.(2)
Include Protein
Protein is a critical part of our diet. Everyone needs a minimum amount of protein every day, even during an emergency.
Protein also gives you a feeling of fullness. Feeling full can help keep you from eating other foods in your emergency supply and make your emergency food supply last longer.(3)
Protein-rich foods include:
- canned or pouched fish,
- canned poultry,
- beans and legumes,
- nuts
- low-fat or non-fat dairy products packaged in shelf-stable packaging. You can usually find these products in the cereal aisle at the grocery store.
Things like canned or packaged tuna, salmon, or chicken; protein bars, nut butters (presuming no one has an allergy), and some non-dairy milk alternatives are good choices for your emergency food supply.
If buying dairy or non-dairy beverages, look for products that are UHT, or Ultra High-Temperature Pasteurization (also referred to as Ultra Pasteurization or UP). These are shelf-stable and do not require refrigeration for safe storage.
If buying canned proteins, look for labels that say canned in water, low sodium, or no salt added.
Avoid Added Sugars
Added sugars include sucrose, dextrose, table sugar, syrups, honey, and sugars from concentrated fruit or vegetable juices.(4)
The leading sources of added sugars in the US diet are sugar-sweetened beverages, such as regular soda (not sugar-free), fruit drinks, and sports drinks, and foods like cookies and cakes.(4)
One way to avoid added sugars in your emergency food supply is to choose foods with little to no added sugar. Examples include fruit canned in its juice or water.
Help Others Create a More Nutritious Food Supply
People get most of their food for an emergency food supply from food retail venues, such as grocery and corner stores, and food pantries. Having healthier food available and making it affordable in places like these empowers people to make healthier food choices every day and when preparing for emergencies.(5)
When nutritious foods are not available, people may settle for foods that are higher in calories and lower in nutritional value.(5)
The whole community can work together to improve access to healthier food in several ways. They include:
- connecting people to healthier foods by addressing transportation gaps in communities.
- increasing nutritious food offerings in food service venues
- bringing partners together to link local food hubs to organizations that sell or serve food in low-income communities.
Learn more ways government, communities, businesses, nonprofit groups, and others can work to improve access to healthier food.
Resources
- Public Health Matters: Keeping your Emergency Kit Nutritious
- Food and Food System Resources During COVID-19 Pandemic
- What’s New with the Nutrition Facts Label (FDA)
- National Hunger Hotline (USDA)
- 3 Day Emergency Diet Plan (Kidney Community Emergency Response)
- American Heart Association Heart-Check Certified Product List
References
- https://www.fda.gov/food/food-labeling-nutrition/changes-nutrition-facts-label
- https://www.cdc.gov/salt/index.htm
- https://www.health.harvard.edu/blog/extra-protein-is-a-decent-dietary-choice-but-dont-overdo-it-201305016145
- https://www.cdc.gov/nutrition/data-statistics/added-sugars.html
- https://www.cdc.gov/nutrition/healthy-food-environments/index.html
Thanks in advance for your questions and comments on this Public Health Matters post. Please note that CDC does not give personal medical advice. If you are concerned you have a disease or condition, talk to your doctor.
Have a question for CDC? CDC-INFO (http://www.cdc.gov/cdc-info/index.html) offers live agents by phone and email to help you find the latest, reliable, and science-based health information on more than 750 health topics.